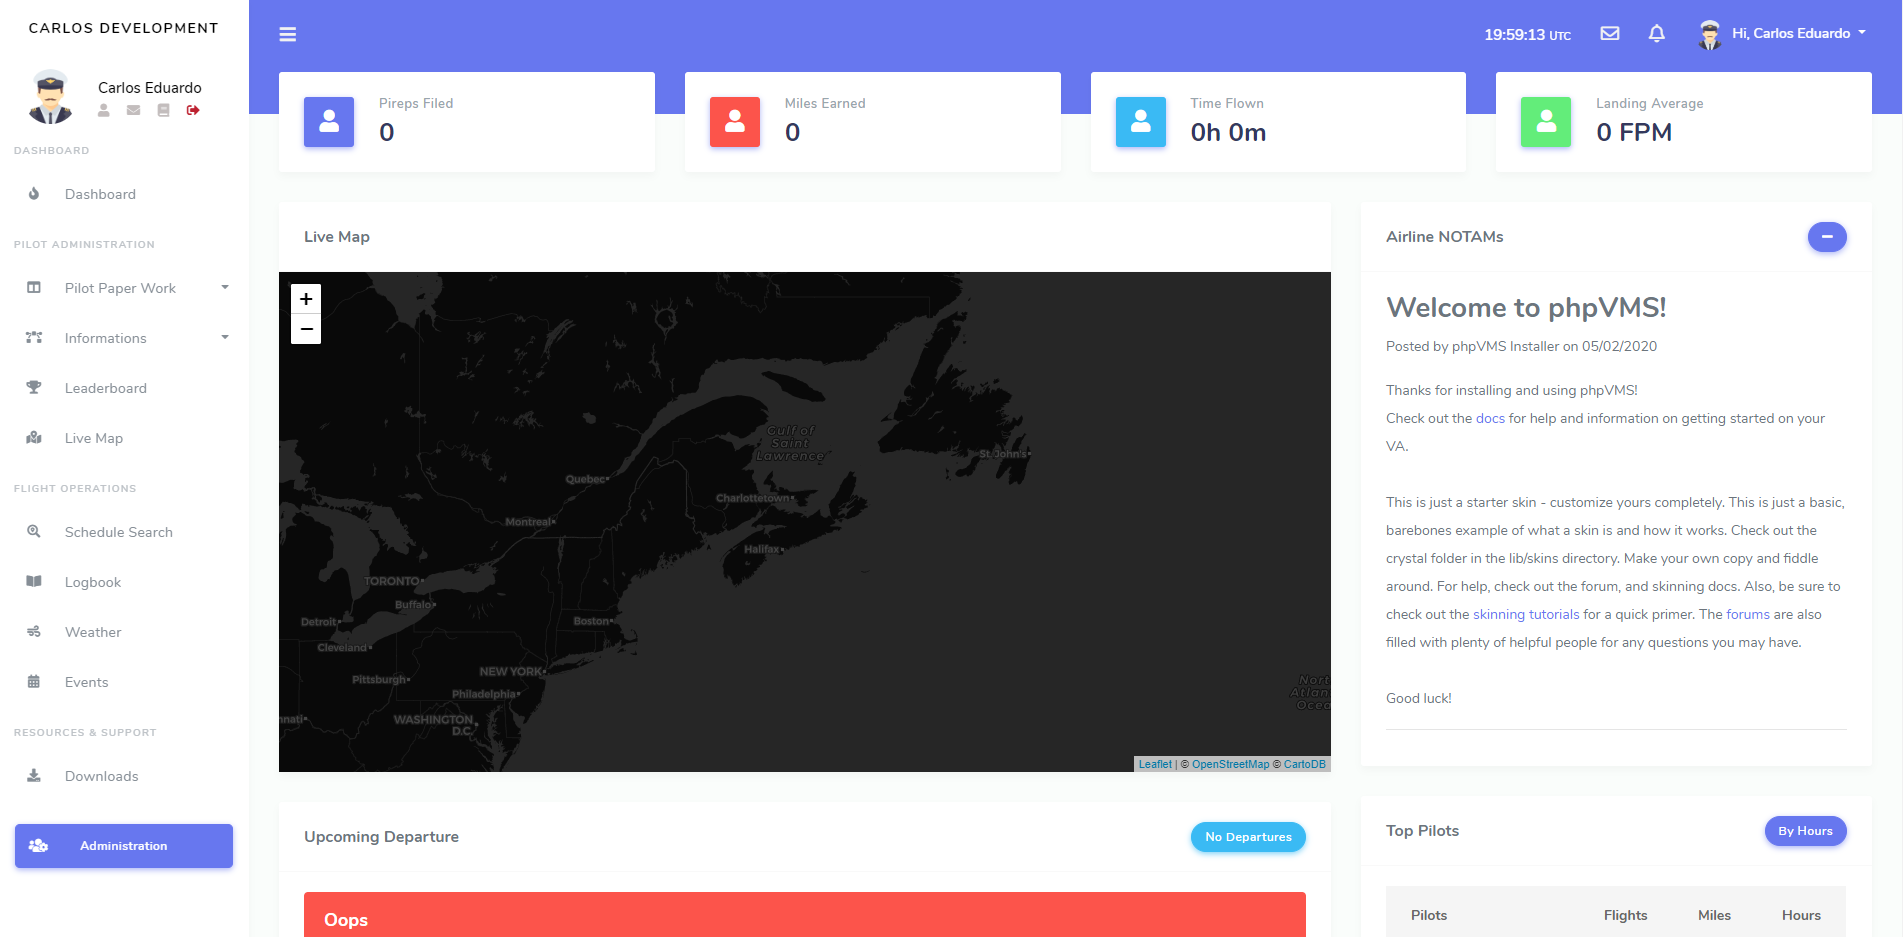
StislaSkin was developed using phpVMS 5.5.2.72 (ProAvia), however it will not work in phpVMS 7 and will not work correctly in 5.5.x.
Documentation
Before Start
Before I start, I wanted to clarify some important things. My name is Carlos Eduardo and I developed this skin for phpVMS. It is important to note that this admin panel was NOT DONE by me, I just adapted the admin panel with phpVMS. StislaSkin uses the admin template "Stisla Admin Template" by Muhamad Nauval Azhar, a free admin panel. Therefore, the importance of keeping the credits on the footer is totally necessary and should not be removed in ANY WAY!!
Get Stisla Admin Get StislaSkinI would like to apologize sincerely if there are any spelling errors, as my native language is not English and I am not fluent at all, so there may be errors.
Requirements
Like many other skins or anything that exists, StislaSkin has some requirements, and all of them are very important. Are they:
- phpVMS 5.5.2.72 from ProAvia
- CheckWX API
- All necessary module (It is not necessary to install because they are already in the file you installed):
- Weather Map (Code Snippets by MrDalle)
- Fltbook v2 (by web541)
- TouchdownStats (by simpilot)
- Event Booking (by simpilot)
- Pilot Career (by servetas)
- TopPilots (by simpilot)
- Extended Fleet (by magicflyer
- Airports (by stuartpb)
- Simbrief for phpVMS (by Vangelis)
- Airmail 3 (by simpilot)
- LiveMap (by me)
- Weather (by me)
- Book Flight by Map (by me)
Package
Due to the large amount of files, I ended up organizing the folders to make the installation as simple as possible. So, in an explanatory way, they are organized in this way:
- 3rd Party Modules: Contains the necessary third party modules.
Note: It is VERY important that you use the modules that are in this folder, and do not install the default module, because the files are modified for the skin. - Core: Contains modified files that are totally necessary for the skin and my modules.
- Lib: Contains files with integration for the Leaflet and new pilot image.
- StislaSkin: And lastly and most importantly, this is your skin folder, which we will talk more about below.
Installation
Now we will start the most difficult part, the installation. It is also very important that you follow all the steps carefully and do everything that is being requested, otherwise, it is very likely that in the end result you will get some error.
Now let's stop winding and go to the installation!
Step One (Skin Installation)
We will start with the most important part, that is, importing our skin into your phpVMS. Let's go then!
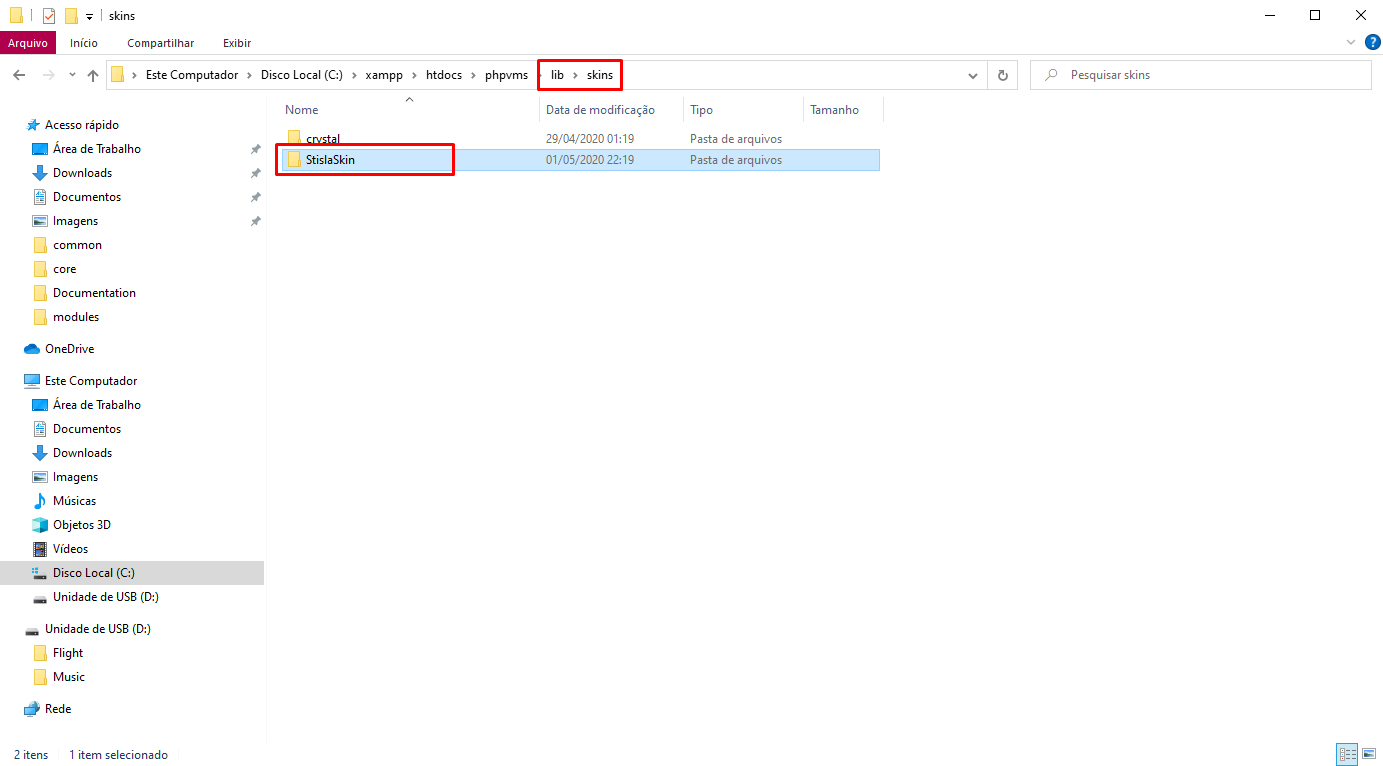
- First, go to the directory where your phpVMS is installed, after that go to "lib/skins".
- We will now go to our installed skin package, and we will go to the main directory (first directory), where you will find the "StislaSkin" folder.
- After finding the "StislaSkin" folder, depending on where you are, copy it or upload it into the "skin" folder, mentioned in the first step.
As I don't have a hosting, I will be using the windows directory (on localhost - XAMPP) as an example. So, the first step is already done and should look like this:
Step Two (Leaflet Conversion)
Okay, so we finished the first step, but it doesn’t mean that everything is okay to start using the skin, we need a few more steps, not least because this is not a simple skin. Now, we will convert Google Maps to Leaflet, a part that will take approximately 5 minutes, or more, or less, but at most 10, I promise.
Our dear Nabeelio, developer of phpVMS, has already made a "post" (I don't know if that's how we talk on github) talking about the Leaflet conversion, it was even where we did the conversion, but as the skin already has some steps accomplished, we will follow the "How to convert" here, which will be more easier.
- First, let's go back to our FTP and go back to the phpVMS directory. After that, open the "/lib" folder.
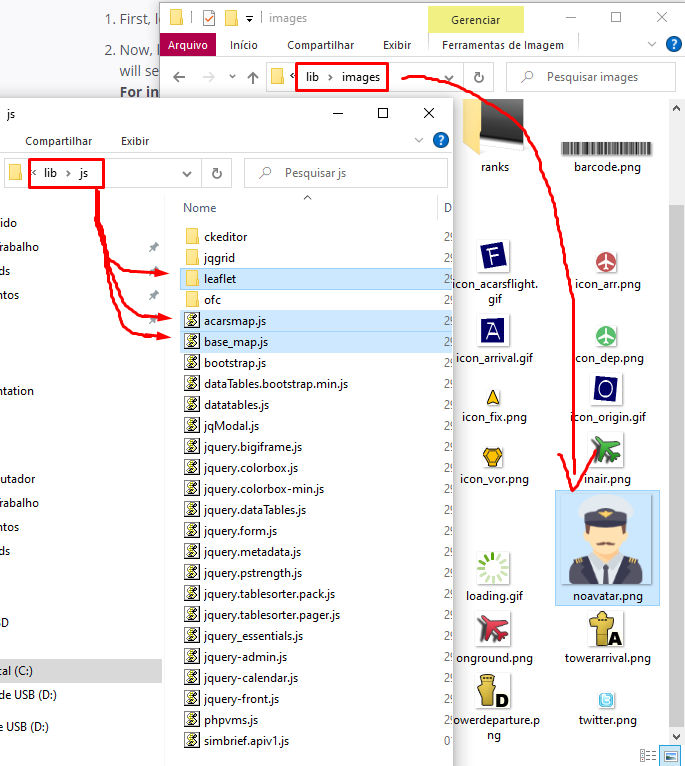
- Now, let's go to our installed package and then main directory again. There you will find the "Lib" folder, open it and you will see two more folders, the folder "js" and "images".
For information only: The "js" folder contains Leaflet files for conversion. And in the folder "images" there is another file, which we will copy as well so we don't waste time. - You must do the following now: Copy or upload the files that are inside the folder "js" in the folder "lib/js" of your FTP. And copy the file from the "image" folder to the "lib/images" folder on your FTP.
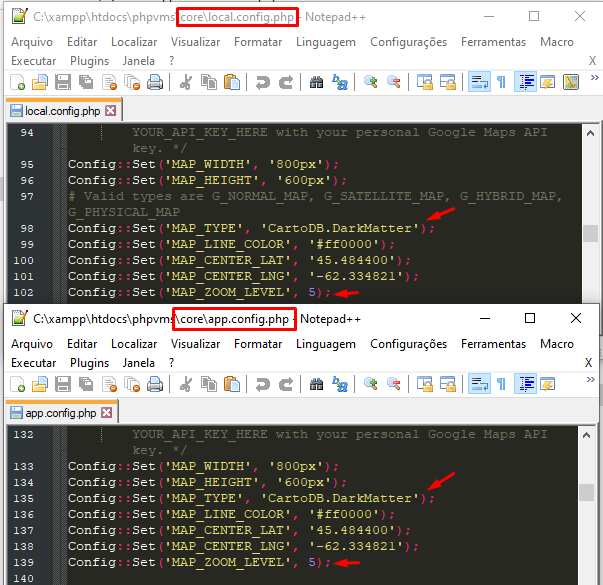
Note: Replace if required. - Now let's open the file "core/app.config.php" and the file "core/local.config.php" from your phpVMS directory and change a few things:
MAP_TYPE
The base map can be customized and changed out to different providers. Find:
Config::Set('MAP_TYPE', 'G_PHYSICAL_MAP');And replace with:
Config::Set('MAP_TYPE', 'CartoDB.DarkMatter');You can also change CartoDB.DarkMatter to a different basemap, but in my opinion, CartoDB.DarkMatter is the best. Those options can be found here.
MAP_ZOOM_LEVEL
The scaling for zoom is different between Google Maps and the Leaflet zoom system. Find:
Config::Set('MAP_ZOOM_LEVEL', 12);And replace with:
Config::Set('MAP_ZOOM_LEVEL', 5);The end result should look like this:
Step Three (Installing third party modules)
Before we start step three, I would like to thank all the creators of the modules used in the skin for making their work available and, moreover, free of charge to the community, as well as all other creators of the module, snippets or developer. It is because of you, it is because of us, that we are making virtual aviation grow and grow closer and closer to reality.
This will be the stage where we must install the modules used in the skin, yes, this step will take a little more time. The installation tutorial for each module is found in the folder of its respective module, as well as the license and everything. The modules that we must install are located in the "3rd Party Modules" folder of the skin package in which you installed.
Modules that must be installed in this step:
- Airmail 3 (by simpilot)
- Airports (by stuartpb)
- Event Booking (by simpilot)
- Extended Fleet (by magicflyer
- Fltbook v2 (by web541)
- Pilot Career (by servetas)
- Simbrief for phpVMS (by Vangelis)
- TopPilots (by simpilot)
- TouchdownStats (by simpilot)
Note: Some modules require you to import a file into the database, so keep an eye on the files!
Step Four (Installing my modules and updating some files)
We have now reached the fourth step, we are almost done! This step is similar to the previous one, but much more relaxed. In this step we will just update some files and insert my METAR module (Where I talk more about activating it in the Weather Module category -> Important to read).
First go to the skin package, where you will see the "Core" folder, open it and you will see two more folders (core and modules), now just transfer the files in their respective FTP directories, so: files that are inside the "common" folder for the "core/common" folder and folders that are inside the "modules" folder for the "core/modules" folder.
So in summary, it would be like this:
- core/common/ACARSData.class.php (Will ask to replace - Added function to obtain number of flights at the moment)
- core/common/OperationsData.class.php (Will ask to replace - Added functions for Fltbook and Simbrief)
- core/common/StatsData.class.php (Will ask to replace - Added function to obtain number of miles for a pilot)
- core/common/WeatherData.class.php (My weather module)
- core/modules/ACARS/ACARS.php (Will ask to replace - Added page for live map in "full screen" and snippet by MrDalle)
- core/modules/PIREPS/PIREPS.php (Will ask to replace - Removed code showing flight map in PIREP)
- core/modules/Profile/Profile.php (Will ask to replace - Removed the code showing the flight map in profile)
- core/modules/Weather/Weather.php (My weather module)
Step Five (Activating the skin)
Finally the time has come when we are in the last step of the installation and we can already activate the skin.
But before we start, we still haven't completely finished the "installation" to be ready to use, after completing this step we must configure some small things before using, which can be found in the category Weather Module and Config File).
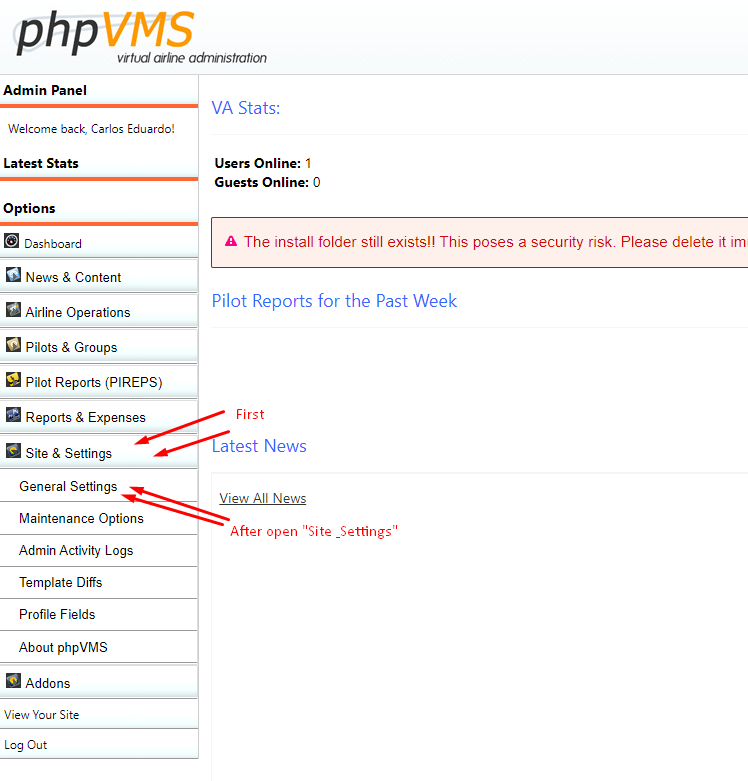
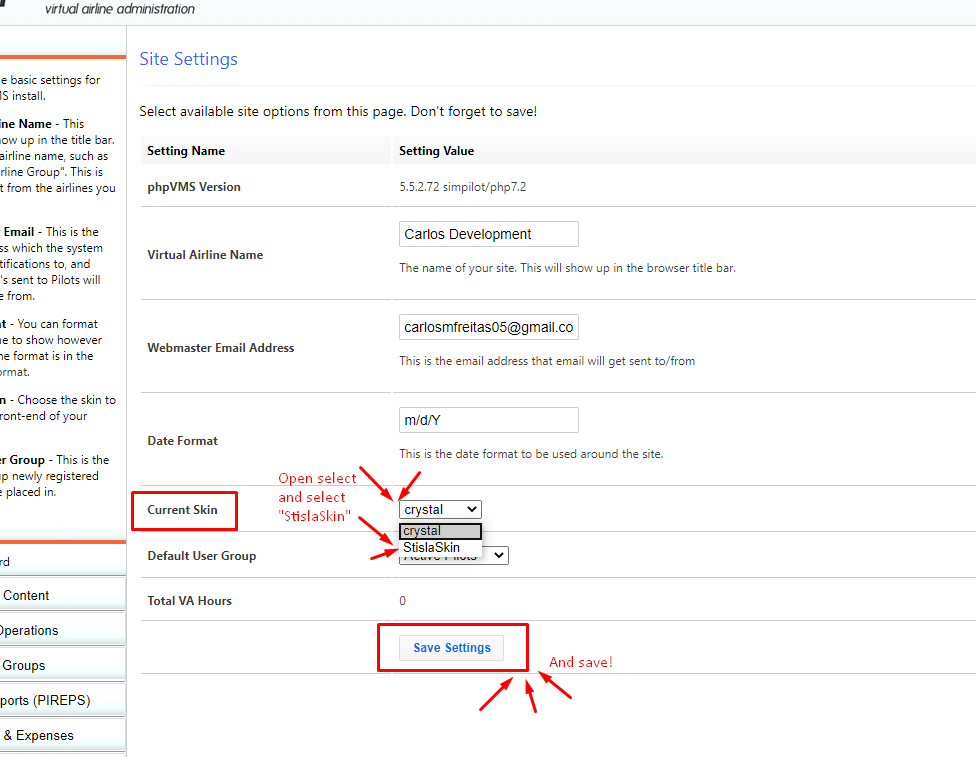
This step is really very simple and very fast. We will now proceed to our website, where we must enter the phpVMS administration panel, click on the "Site & Settings" menu and finally open the "General Settings" page. There you will find a form with the main settings for your VA, but we will focus on the "Current Skin" section, in select, you must select our skin, that is: StislaSkin and save. And ready, StislaSkin should already be active and working almost perfectly on your website!
Photo tutorial:
Weather Module (About & Activation)
The Weather module was developed by me and mainly by StislaSkin. This is a simple module, but easy to use, to show a specific METAR, this module also obtains information about the airport and TAF.
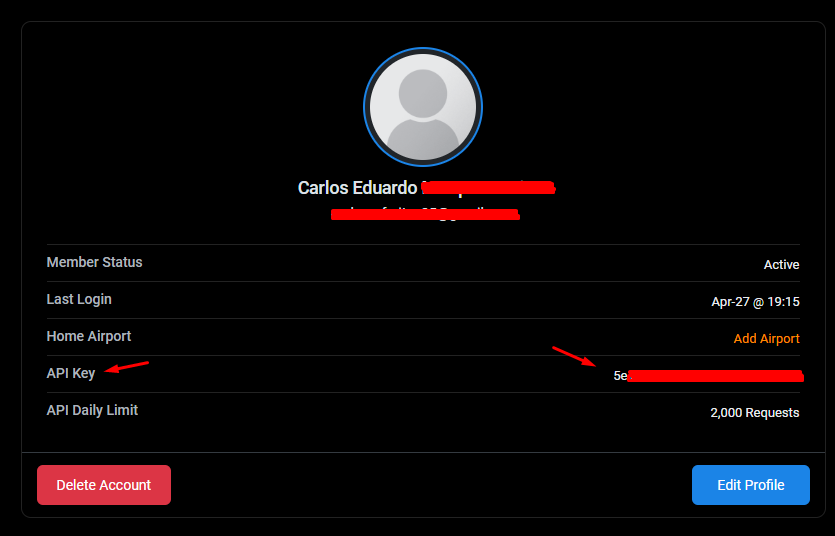
To use this module it is necessary to have a CheckWX.com API Key (Free or paid), see how to obtain:
- First, you must access the CheckWX.com website and register to obtain your API Key.
- And just that, very simple, after registering you must fill out a small form and the site will already give you your new API key, but we still have to insert it in the module.
Let's now learn how to insert your key into the module:
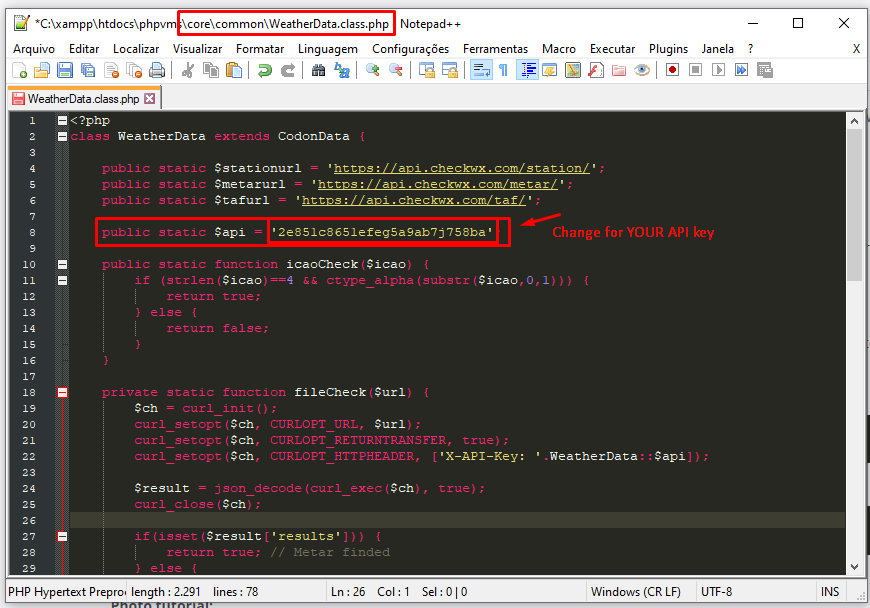
- To add the key is also very simple, first we must access the file "WeatherData.class.php" that was transferred to your hosting in step four of the installation. The file will be in "core/common/WeatherData.class.php".
- After opening the file, in line "8" you will see the following code:
- And ready! The API is already inserted in the module, save the file and close.
public static $api = 'API_KEY_HERE';You should just replace where "API_KEY_HERE" is with your API key. It should look something like:
public static $api = '2e851c8651efeg5a9ab7j758ba';Photo tutorial:
Config File (Configuring the skin)
Finally!! We have reached the stage that after completing we can already use the skin successfully! This is also an important file and with future updates it will be even more important.
This steps we will configure the file "config.json" (located in lib/skins/StislaSkin/config.json), which as the name says is a configuration file, so that we will not be repeating several names/codes in several files, you will just fill in the file and the skin will already get the informations.
Here you can see the file structure (Really quite simple in this version):
{
    "dashboard": "1",
    "discordID": "",
    "VAicao": "CC"
}
So let's see what each thing in the structure is (Image of each one below the table):
| dashboard | discordID | VAicao |
|---|---|---|
| Here you can change the layout of the dashboard you want. 1 = Default 2 = Modified |
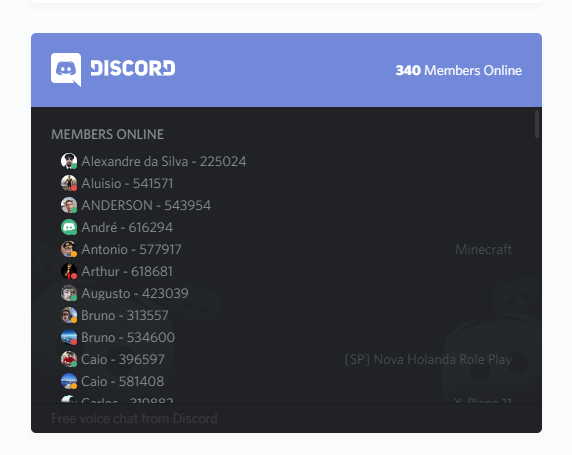
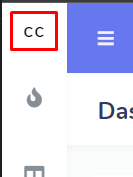
Here you can enter the server ID of your discord and a widget for your server will appear on the dashboard. Leave empty (as is) if you don't have it or don't want to. | Here you can enter the ICAO or IATA of your airline, or something else, but with a maximum of 3 letters (It will appear with the sidebar closed). |
Files (Explaining some files)
- frontpage_main.php: One of the most important, here you will find the codes of your dashboard (Default).
- frontpage_main_two.php: Here you can find the codes of your dashboard (modified).
- app_top.php: Here you can find the codes for the sidebar and navbar.
- layout.php: Also one of the most important, here you will find the beginning and the end of the skin structure, like script, style and other tags.
- profil_main.php: Here you will find the codes of the pilot profile page (personal).
- pilot_public_profile.php: Here you will find the codes of the pilot profile page (public).
- pireps_viewreport.php: Here you will find the codes of the PIREP page.
- schedule_bids.php: Here you will find the codes on the reservation page.
Support (& Suggestions)
You can contact me through the phpVMS forum, I usually reply, but if I don't answer, you can call me on my Instagram, which I'm sure I'll answer. Just like my other skin (ElaSkin), I will be creating a post (here) where you can comment at will, giving suggestions, help with any errors, etc. It is even better because besides I can help you, the community can also help you, in addition, if someone else has the same error, the answer will already be in the forum.
I will also be opening a "vote" on the same post where you can give your opinion of the skin, so I know how to improve more and more.
StislaSkin phpVMS Forum Post
Thank you for choose StislaSkin!
Remember not to remove the credits from the used admin panel, the creator of the crewcenter and phpVMS, it is very important!
